Crafty Corner: Gold Glitter Champagne Bottles

78768-500

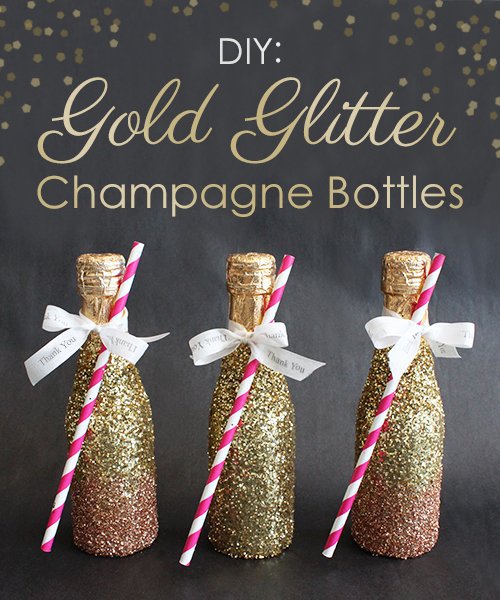
Get ready to dazzle your guests with this very simple DIY from blog.beau-coup.com!  Thank you Beau-Coup for this great tutorial!

SUPPLIES

  • Bottles: Try using mini cider bottles to create an easy to carry favor for guests
  • Decorative straws &  personalized ribbon for the final look
  • Glitter: Mix of coarse glitter and fine glitter, and different shades for an ombre effect if desired
  • Spray Glue & Scissors


INSTRUCTIONS

  1. APPLY GLUE

    Spray the cider bottle with the glue and let sit for 5 minutes. You can use a paintbrush to further spread it if it doesn’t spray on evenly.

    [PRO TIP] This part can get messy, so apply the glue inside of an open top box for easy clean up.

  2. ADD GLITTER

    Create a pile of the coarse glitter and roll the bottle through the glitter pile as evenly as possible.

    [PRO TIP]  Pour glitter pile on top of construction paper for easy clean up.

    Repeat this process a few times to attain as full of coverage as possible. Use your fingers to add glitter to the “naked” portions of the bottle as necessary.

    [PRO TIP] Use additional glue and glitter as required to cover any bare spots.  Use a silicone or lacquer sealer afterwards to keep the glitter in place.

  3. FINISH THE LOOK

You did it! You’ve successfully glittered your bottles for a decadently elegant look. Now finish the project by tying a decorative straw and  personalized ribbon to complete the look for a gorgeous presentation. This cute finished project is a delicious treat that guests can enjoy at the party or bring home as a unique souvenir!

[PRO TIP] For an ombre effect, add a little glue to the bottom of the completed bottle. Using a fine glitter with a different color, sprinkle along bottom of bottle.

(Source:  blog.beau-coup.com)

Fab Fitness | Yoga with Adriene [Session 13]

Friday Tracks [Christmas Edition]: Pentatonix | “Mary, Did You Know?”

Cool Whips: Gingerbread Fudge

gingerbread-fudge-1

A quick and easy gingerbread fudge recipe. Perfectly spiced and festive, this gingerbread fudge is creamy and crunchy thanks to the festive Christmas sprinkles.


Yield: 8×8-inch slab of fudge

Prep Time: 5 minutes

Cook Time: 2 minutes

INGREDIENTS

  • ¾ cup sweetened condensed milk
  • 12oz white chocolate, chopped (or chips)
  • 2-3 tsp ginger, sifted
  • ½-1 tsp cinnamon, sifted
  • ½-1 tsp nutmeg, sifted

DIRECTIONS

  1. Pour the condensed milk and white chocolate chips into a microwave-safe bowl. Heat for 2-3 minutes, or until the white chocolate chips are almost completely melted. DO NOT OVERHEAT! Stir until completely blended, melted and smooth.
  2. Immediately add the spices and combine thoroughly.
  3. (Optional) Add a handful of sprinkles and fold in quickly. They will melt and make the mixture an awful muddy colour if stirred for too long.
  4. Transfer to an 8×8 inch aluminium foil-lined baking pan. Leave to set either in the refrigerator or at room temperature. If you live in a hot and humid climate, it’s preferable to allow to set in the refrigerator.
  5. Once set, cut into cubes. Store leftovers in an airtight container in a cool, dry place.

NOTES

  • Prep time doesn’t include setting time which usually takes about 3 hours.
  • If stored in an airtight container, they should keep for 2 weeks.

(Source:  sweet2eatbaking.com)

Crafty Corner: Reindeer Noses Mason Gift Jars

The Hankful House Title Image

SUPPLIES

  • Chocolate Whoppers
  • Red Gumballs (for Rudolph’s nose)
  • Brown Pipe Cleaners
  • Brown Paint
  • Tape
  • Gift Tags
  • Hot Glue Gun
  • Mason Jars
  • Ribbon
  • Googly Eyes
  • Bright Red Pom Poms
  • Stamps

Reindeer Noses 006


INSTRUCTIONS

  • Follow the visuals below:

Reindeer Noses 010Reindeer Noses 022 Reindeer Noses 018 Reindeer Noses 015Reindeer Noses 066

(Source:  thehankfulhouse.com)


Fab Fitness | Yoga with Adriene [Session 12]

Friday Tracks: Chris Tomlin | “Noel” [feat. Lauren Daigle]

Cool Whips: Red Velvet Cupcakes In A Jar

Red Velvet Cupcakes

Yield: 8 servings

Prep Time: 15 minutes

Cook Time: 24 minutes


INGREDIENTS

For the Cupcakes

  • 1 cup cake flour
  • 2 tablespoons unsweetened cocoa powder
  • 1/2 teaspoon kosher salt
  • 2/3 cup vegetable oil
  • 3/4 granulated sugar
  • 1 egg
  • 1 teaspoon pure vanilla extract
  • 2 tablespoons red food coloring
  • 1/2 cup buttermilk
  • 1/2 teaspoon baking soda
  • 3/4 teaspoon white vinegar

For the Cream Cheese Frosting

  • 8 ounces cream cheese, softened to room temperature
  • 3 tablespoons butter, softened to room temperature
  • 1 pound confectioners’ sugar (about 3 ¾ cups), sifted
  • 2 teaspoons clear vanilla extract*


DIRECTIONS

For the Cupcakes

  1. Preheat oven to 350 degrees. Line 12 cupcake wells with paper liners or spray pan with spray with nonstick cooking spray.
  2. Sift together cake flour, cocoa powder, and salt.
  3. In the bowl of a stand mixer fitted with the whisk attachment, combine oil and sugar until well-blended. Add egg and mix until combined.
  4. Turn your mixer down to the lowest speed and add vanilla, then slowly add in the food coloring. Note: If you are using liquid food coloring, it will take about 2 tablespoons of coloring to get a dark red shade. I used about 1 tablespoon of gel dye to achieve the shade in the photographs. Add the dye slowly and color according to your preference.
  5. Add flour mixture alternately with buttermilk in two batches; scrape down the side of the bowl. Continue mixing until just combined, taking care not to over mix.
  6. Place baking soda in a small dish, stir in vinegar and add to batter with the machine running. Beat for about 10 seconds.
  7. Using a medium scoop (about 3 tablespoons), divide batter between the 12 wells, filling each well about 2/3 full of batter. Bake for 20-24 minutes or until a toothpick inserted comes out clean. Be careful not to over bake.

For the Cream Cheese Frosting

  1. In a the bowl of a stand mixer fitted with the paddle attachment, cream together cream cheese and butter until well combined.
  2. With the mixer on low, gradually add the confectioners’ sugar until thoroughly incorporated and smooth. Add vanilla and mix to combine.

To Assemble in Jars

  1. Slice cupcakes horizontally to create layers. Each cupcake will yield 2-3 layers depending on how thick you want your layers to be.
  2. Place one cupcake layer into the bottom of your jar, pipe a layer of cream cheese frosting directly onto the cake layer. Repeat the layering process until you reach the top of your jar. If desired, garnish with festive sprinkles or red velvet cake crumbs.


NOTES

  • Clear vanilla extract was used in the cream cheese frosting recipe to maintain a bright white color. Feel free to substitute pure vanilla extract in its place.
  • I used a Wilton 1A tip to pipe the frosting into the jars.
  • The sprinkles are made by Wilton.
  • Jars seen in photos are Weck Tulip Jelly Jars.

(Source:  mybakingaddiction.com)